
- Profish Reload E - Bixpy Electric…
- Profish GT E - Bixpy Electric Jet…
- Profish 400 E - Bixpy Electric…
- Bixpy J-2 Motor and Quick-Swap…
- Bixpy J-2 Motor and Battery Combo…
- Bixpy J-2 Battery & Remote 848…
- Bixpy 12v Accessory Battery 10…
- Bixpy J-2 Jet Motor Only 8529
- Bixpy Remote - Gen 1 model 864…
- Bixpy Remote - Gen 2 9594
- Bixpy Quick Swap Rudder Kit 86…
- Rudder Bracket & Toe Tabs kit …
- Uphaul Kit for Viking Rudder 9…
- Bixpy Adapter for Inflatables -…
- Bixpy Transom Adapter for J-2 Motors…
- Bixpy Kit for Non-Ruddered Kayaks…
- Bixpy - Extension Cable 1.4m (4.5')…
- Bixpy - Extension cable 2.7m (9')…
- US Fin Adapter (J-1 and J-2 Motors)…
- Bixpy - Spring for Quick Swap Rudder…
- Bixpy Propeller 8892
- Bixpy Propeller Weed Guard 940…
- Bixpy Battery Charger 8787
- Extension Kit for Bixpy Battery…
- Replacement clip for Bixpy motor…
- Dielectric Grease - Super Lube…
- Bixpy Magnetic Kill Switch 894…
- Bixpy - Simple Gudgeon 8829
- FPV 7ah Lithium Battery and Charger…
- FPV 17.5ah Lithium Battery and…
- FPV - 12V 5A Voltage Regulator…
- FPV - 12V 1.5A Voltage Regulator…
- FPV - 3A Fused Pigtail 9291
- FPV - Male Pigtail 8426
- FPV - Double Pigtail 9290
- FPV - Parallel Pigtail 9055
- FPV - Battery to Cigarette Lighter…
- FPV - End Caps for Pigtail & Battery…
- FPV 5V 1-2A Dual USB Port Charger…
- FPV - Smart Charger EV-C1XR 1 …
- FPV Waterproof Switch with Harness …
- FPV - 12V 2A Wall Charger 9286
- Railblaza - Rod Tube & HD Starport…
- Railblaza Rod Tube only 8790
- RailBlaza Rod Holder II with Starport…
- Railblaza Visibility Kit ll 76…
- Railblaza StarPort HD 2467
- Railblaza Star Port with Base +…
- Railblaza Rotating Platform R …
- Railblaza Camera Boom 600 R-Lock…
- Railblaza - 25mm Towing Eye 17…
- Flag fits into RailBlaza Starport…
- Railblaza G-Hold 75mm 1734
- Railblaza Kayak Motor Mount 78…
- Railblaza Wall Sling 1993
- RailBlaza Kayak Fish Finder Transducer…
- Lowrance Reveal 7 Splitshot with…
- Lowrance Reveal 5 Splitshot with…
- Lowrance Hook2 4x with GPS Plotter…
- Fish Finder Install Kit - Reload,…
- FPV 7ah Lithium Battery and Charger…
- FPV 17.5ah Lithium Battery and…
- Battery - 7ah - SLA 1194
- Battery Charger - SLA 2199
- Professional Fish Finder Installation…
- BerleyPro Visor for Lowrance Hook2…
- BerleyPro Visor for Lowrance Hook2/Reveal…
- BerleyPro Visor for Lowrance Hook2…
- Cobra VHF 6 watts Floating 180…
- Electronic Flare - Ocean Signal…
- Personal Locator Beacon - RescueMe…
- Fuse Holder 6404
- Cable Cover 1206
- P Clip and Screw 3215
- Female 6.3 Q.C. Connector 9082
- Rod Holder - Flush Mount 1037
- Paddle/Rod Leash - Stainless Steel…
- Running Rig *Drift Chute NOT included…
- Drift Chute - NZ Design 1162
- Kayak Anchor Kit in bag 1063
- Viking Tackle Pod for Profish GT…
- Viking Kid Pod - Reload & GT 2…
- Viking Tackle Pod for Profish 400…
- Viking Chill Pod for Reload, 400…
- Dive Flag - Fits Starport 9683
- Kayak Gaff - stainless steel 2…
- Kayak Fishing Landing Net 1749
- Cell Phone Dry Bag - Wilco 190…
- Scupper Plugs - pair 2190
- Thigh Braces - Pair 2202
- Running Rig For Profish 400 Stephen…
- Cobra VHF 6 watts Floating 180…
- Electronic Flare - Ocean Signal…
- Railblaza Visibility Kit ll 76…
- Paddle/Rod Leash - Stainless Steel…
- Profish Angler PFD Size XS-M …
- Profish Angler PFD Size L-XXL…
- Yak PFD - High Back Fishing 80…
- Child Adjustable Hi-Viz PFD Hu…
- PFD Childs Hi Viz - Loose Unit
- Flag fits into RailBlaza Starport…
- McMurdo RescueMe PLB1 9982
- Dive Flag - Fits Starport 9683
- Cell Phone Dry Bag - Wilco 190…
- Thigh Braces - Pair 2202
- Viking Tackle Pod for Reload 2022…
- Viking Tackle Pod for Profish GT…
- Viking Kid Pod - Reload & GT 2…
- Viking Tackle Pod for Profish 400…
- Viking Chill Pod for Reload, 400…
- Centre Well cover - Profish 400…
- Insulated Cover for Profish 400,…
- Chill Pod Surf Strap 1965
- Insulated Fish Bag - Profish 400,…
- Chill Pod Fit Kit for 400/GT/Reload…
- Rod Tip Protector 9765
- Fish Finder Install Kit - Reload,…
- Fuse Holder 6404
- Cable Cover 1206
- P Clip and Screw 3215
- Viking Hatch 155mm (6 inch) 10…
- Hatch Fit Kit for Viking Hatch…
- Drainage Bung 9745
- Viking Kayak Handle 1723
- Rudder for Profish Models *Factory…
- Rudder Kit for Profish Models *DIY…
- Rudder Kit for Tempo 2 8938
- Rudder Cable Tubes - pair 9706
- Rudder cords with Carabiners -…
- Rudder Blade with Headstock 25…
- Replacement Rudder Blade - Mk3…
- Eye Bolts for Rudder Headstock…
- Carabiner for Rudder Cable 874…
- Bolt & Nut for Rudder Toe Tabs…
- Footrests - pair 1092
- Rod Holder - Flush Mount 1037
- Nylon Saddle with Screws 1070
- Vertical StayPut & Screws 5011
- Stayput Threaded - fits inserts…
- Button & Screw 1064
- Lashing Hook & Screws 1826
- Deck Loop - Bungey Loop 1224
- Stainless Saddle 34mm 2420
- Stainless Saddle & Well Nuts
- Well Nut, Washer & Screw 1287
- Quicklink & Pulley Set 1147 13…
- Quicklink - Stainless 40mm 114…
- Stainless Pulley 1317
- Viking Yellow Fleck Cord 1115
- Shock Cord 6mm 9702
- Machine Screw M5x25mm Pan Pozi…
- Machine Screw M5x16mm Pan Pozi…
- Machine Screw M5x10mm Pan Pozi…
- Viking Tackle Pod for Profish GT…
- Viking Kid Pod - Reload & GT 2…
- Centre Well cover - Profish 400…
- Chill Pod Surf Strap 1965
- Deck Line Ball 7762
- Swivel Clip Stainless Steel 70mm…
- Seat Clip 9285
- Rudder Bracket & Toe Tabs kit …
- Clip S/S Spring Eye 50mm 1277
- Bixpy - Spring for Quick Swap Rudder…
- Terminal End for Shock Cord 21…
- Viking Bumper Sticker 200x125 …
- Large Hatch Bucket - 150mm deep…
- Rubber Grommet 4220
- Rudder Cord Tensioner (single)…
- Thigh Brace Fit Kit - Stainless…
- Screw 14g x 3/4 *Used with flush…
- Screw 10g x 5/8 *Used with handles…
- Trigger Snap Clip Stainless 24…
- Oval Hatch cover 6919
- Selleys All Clear 80g 9523
- Female 6.3 Q.C. Connector 9082
- Deck Line Guide - for deck bungee…
- HD Saddles & Screws Kit for Running…
- Paddle Park Kit 2093
- Bixpy motor fitting instructio…
- Bixpy Connections Maintenance
- Bixpy Uphaul Fitting Instructi…
- Rudder Fitting Instructions
- Rudder Cable Tubes Fitting
- Rudder Toe Tabs - Setting up on…
- Rudder - Profish 440 Instructi…
- Rudder - Profish 400 Instructi…
- Rudder - Long Blade Fitting In…
- Footrests for Espri kayak
- Footrests in Small Kayaks
- Fish Finder - Reload or GT
- Fish Finder - Garmin 400C tran…
- Fish Finder - Fit TotalScan Transducer…
- How to get back on your kayak …
- Fish Finder - Profish 400
- Fish Finder - Profish 440
- How to repair a dent in your k…
- Kayak Storage
- Repair my Kayak
- Propelz Speed paddle - Assembling…
- Transporting your Kayak
- FG Knot - Tying Braid to Nylon
- Applying new Stickers (Graphic…
- Burnsco Marine - Albany
- Burnsco Marine - Half Moon Bay
- Burnsco Marine - Manukau
- Burnsco Marine - Mt Wellington
- Burnsco Marine - Westhaven
- Burnsco Marine - Whangaparaoa
- Canoe & Kayak Botany
- Canoe & Kayak Hibiscus Coast
- Canoe & Kayak North Shore
- Canoe & Kayak Sandringham
- Fergs
- Fishing Boating Outdoors (FBO)
- Hunting & Fishing Botany
- Canoe & Kayak Taranaki
- Burnsco Marine - Hamilton
- Burnsco Marine - Mount Maungan…
- Burnsco Marine - Tauranga
- Canoe & Kayak Hamilton
- Canoe & Kayak Taupo
- Canoe & Kayak Tauranga
- Gisborne - Stirling Sports
- Hunting & Fishing - Tauranga
- Hunting & Fishing - Whakatane
- Hunting & Fishing, Fly & Gun -…
- Thames Coast Kayaks
- Whitianga - Longshore Marine
- Home
-
Kayaks
- Profish Reload E - Bixpy Electric Jet 9043
- Profish GT E - Bixpy Electric Jet 9041
- Profish 400 E - Bixpy Electric Jet 9044
- Profish Reload -Premium Fishing Kayak 1306
- Profish 400-Lighter weight Fishing Kayak 1654
- Profish GT - Ultra Stable Fishing Kayak 2489
- Espri Angler - Family Fishing Kayak 1593
- Tempo 2 - Specialized Double Fishing Kayak 7177
- Viking 2 + 1 - Double,Triple or Solo 6541
- Espri - Family & Cruising Kayak 1047
- Nemo - Family Fun Kayak 1156
- Ozzie - Light & Stable Family Kayak 1033
- Oxygen 5.7 Ski - Fitness & Touring
-
Accessories
- Bixpy Electric Jet Motor
- Profish Reload E - Bixpy Electric Jet 9043
- Profish GT E - Bixpy Electric Jet 9041
- Profish 400 E - Bixpy Electric Jet 9044
- Bixpy J-2 Motor and Quick-Swap Kit 8671
- Bixpy J-2 Motor and Battery Combo 9850
- Bixpy J-2 Battery & Remote 8488
- Bixpy 12v Accessory Battery 10171
- Bixpy J-2 Jet Motor Only 8529
- Bixpy Remote - Gen 1 model 8649
- Bixpy Remote - Gen 2 9594
- Bixpy Quick Swap Rudder Kit 8675
- Rudder Bracket & Toe Tabs kit 9024
- Uphaul Kit for Viking Rudder 9833
- Bixpy Adapter for Inflatables - J2
- Bixpy Transom Adapter for J-2 Motors 9284
- Bixpy Kit for Non-Ruddered Kayaks 9505
- Bixpy - Extension Cable 1.4m (4.5') 9345
- Bixpy - Extension cable 2.7m (9') 8487
- US Fin Adapter (J-1 and J-2 Motors) 8894
- Bixpy - Spring for Quick Swap Rudder Uphaul 9699
- Bixpy Propeller 8892
- Bixpy Propeller Weed Guard 9402
- Bixpy Battery Charger 8787
- Extension Kit for Bixpy Battery 9629
- Replacement clip for Bixpy motor 9191
- Dielectric Grease - Super Lube 9771
- Bixpy Magnetic Kill Switch 8946
- Bixpy - Simple Gudgeon 8829
- FPV Lithium Batteries and Accessories
- FPV 7ah Lithium Battery and Charger 8374
- FPV 17.5ah Lithium Battery and Charger 8373
- FPV - 12V 5A Voltage Regulator 8377
- FPV - 12V 1.5A Voltage Regulator 8376
- FPV - 3A Fused Pigtail 9291
- FPV - Male Pigtail 8426
- FPV - Double Pigtail 9290
- FPV - Parallel Pigtail 9055
- FPV - Battery to Cigarette Lighter Adapter 9666
- FPV - End Caps for Pigtail & Battery 9289+9287
- FPV 5V 1-2A Dual USB Port Charger 10170
- FPV - Smart Charger EV-C1XR 1 9766
- FPV Waterproof Switch with Harness 10060
- FPV - 12V 2A Wall Charger 9286
- Railblaza Accessories
- Railblaza - Rod Tube & HD Starport 8578
- Railblaza Rod Tube only 8790
- RailBlaza Rod Holder II with Starport 1680
- Railblaza Visibility Kit ll 7664
- Railblaza StarPort HD 2467
- Railblaza Star Port with Base + Self Tap Screws 1563
- Railblaza Rotating Platform R 9157
- Railblaza Camera Boom 600 R-Lock 9155
- Railblaza - 25mm Towing Eye 1730
- Flag fits into RailBlaza Starport Base 1564
- Railblaza G-Hold 75mm 1734
- Railblaza Kayak Motor Mount 7856
- Railblaza Wall Sling 1993
- RailBlaza Kayak Fish Finder Transducer Mount Kit 8721
- C-Tug Kayak Trolley
- Fish Finders, Batteries, VHF Radios
- Lowrance Reveal 7 Splitshot with AUS/NZ Maps 9541
- Lowrance Reveal 5 Splitshot with AUS/NZ Maps 9540
- Lowrance Hook2 4x with GPS Plotter 7210
- Fish Finder Install Kit - Reload, GT, PF400 7542
- FPV 7ah Lithium Battery and Charger 8374
- FPV 17.5ah Lithium Battery and Charger 8373
- Battery - 7ah - SLA 1194
- Battery Charger - SLA 2199
- Professional Fish Finder Installation 7114
- BerleyPro Visor for Lowrance Hook2 - 4 9509
- BerleyPro Visor for Lowrance Hook2/Reveal 5 Viso 9449
- BerleyPro Visor for Lowrance Hook2 / Reveal 7 Viso 9446
- Cobra VHF 6 watts Floating 1803
- Electronic Flare - Ocean Signal EDF1 9832
- Personal Locator Beacon - RescueMe PLB 1 9982
- Fuse Holder 6404
- Cable Cover 1206
- P Clip and Screw 3215
- Female 6.3 Q.C. Connector 9082
- Kayak Fishing Accessories
- Rod Holder - Flush Mount 1037
- Paddle/Rod Leash - Stainless Steel 1098
- Running Rig *Drift Chute NOT included 5860
- Drift Chute - NZ Design 1162
- Kayak Anchor Kit in bag 1063
- Viking Tackle Pod for Profish GT 2222
- Viking Kid Pod - Reload & GT 2188
- Viking Tackle Pod for Profish 400 2121
- Viking Chill Pod for Reload, 400 & GT 1759
- Dive Flag - Fits Starport 9683
- Kayak Gaff - stainless steel 2275
- Kayak Fishing Landing Net 1749
- Cell Phone Dry Bag - Wilco 1902
- Scupper Plugs - pair 2190
- Thigh Braces - Pair 2202
- Running Rig For Profish 400 Stephen Tapp design
- Life Jackets & Safety Gear
- Cobra VHF 6 watts Floating 1803
- Electronic Flare - Ocean Signal EDF1 9832
- Railblaza Visibility Kit ll 7664
- Paddle/Rod Leash - Stainless Steel 1098
- Profish Angler PFD Size XS-M 9937
- Profish Angler PFD Size L-XXL (will fit to 4XL) 10114
- Yak PFD - High Back Fishing 8025+8114
- Child Adjustable Hi-Viz PFD Hutchwilco
- PFD Childs Hi Viz - Loose Unit
- Flag fits into RailBlaza Starport Base 1564
- McMurdo RescueMe PLB1 9982
- Dive Flag - Fits Starport 9683
- Cell Phone Dry Bag - Wilco 1902
- Thigh Braces - Pair 2202
- Clothing Systems
- Paddles
- Backrest Seats & Cushions
- Tackle & Chill Pods, Well Covers & Bags
- Viking Tackle Pod for Reload 2022 10121
- Viking Tackle Pod for Profish GT 2222
- Viking Kid Pod - Reload & GT 2188
- Viking Tackle Pod for Profish 400 2121
- Viking Chill Pod for Reload, 400 & GT 1759
- Centre Well cover - Profish 400 7626
- Insulated Cover for Profish 400, Reload, GT 1649
- Chill Pod Surf Strap 1965
- Insulated Fish Bag - Profish 400, Reload, GT 7228
- Chill Pod Fit Kit for 400/GT/Reload Chill pod 6818
- Rod Tip Protector 9765
- Roof Rack Systems
- Parts & Hardware
- Fish Finder Install Kit - Reload, GT, PF400 7542
- Fuse Holder 6404
- Cable Cover 1206
- P Clip and Screw 3215
- Viking Hatch 155mm (6 inch) 1077
- Hatch Fit Kit for Viking Hatch 9930
- Drainage Bung 9745
- Viking Kayak Handle 1723
- Rudder for Profish Models *Factory Fitted 9827
- Rudder Kit for Profish Models *DIY Kit 5013
- Rudder Kit for Tempo 2 8938
- Rudder Cable Tubes - pair 9706
- Rudder cords with Carabiners - pair 7054
- Rudder Blade with Headstock 2501
- Replacement Rudder Blade - Mk3 9653
- Eye Bolts for Rudder Headstock (Pair) 8850
- Carabiner for Rudder Cable 8740
- Bolt & Nut for Rudder Toe Tabs (pair) 9142
- Footrests - pair 1092
- Rod Holder - Flush Mount 1037
- Nylon Saddle with Screws 1070
- Vertical StayPut & Screws 5011
- Stayput Threaded - fits inserts 1717
- Button & Screw 1064
- Lashing Hook & Screws 1826
- Deck Loop - Bungey Loop 1224
- Stainless Saddle 34mm 2420
- Stainless Saddle & Well Nuts
- Well Nut, Washer & Screw 1287
- Quicklink & Pulley Set 1147 1317
- Quicklink - Stainless 40mm 1147
- Stainless Pulley 1317
- Viking Yellow Fleck Cord 1115
- Shock Cord 6mm 9702
- Machine Screw M5x25mm Pan Pozi 1737
- Machine Screw M5x16mm Pan Pozi 2035
- Machine Screw M5x10mm Pan Pozi 1498
- Viking Tackle Pod for Profish GT 2222
- Viking Kid Pod - Reload & GT 2188
- Centre Well cover - Profish 400 7626
- Chill Pod Surf Strap 1965
- Deck Line Ball 7762
- Swivel Clip Stainless Steel 70mm 10128
- Seat Clip 9285
- Rudder Bracket & Toe Tabs kit 9024
- Clip S/S Spring Eye 50mm 1277
- Bixpy - Spring for Quick Swap Rudder Uphaul 9699
- Terminal End for Shock Cord 2115
- Viking Bumper Sticker 200x125 9593
- Large Hatch Bucket - 150mm deep 9298
- Rubber Grommet 4220
- Rudder Cord Tensioner (single) 7530
- Thigh Brace Fit Kit - Stainless 2205
- Screw 14g x 3/4 *Used with flush rod holders 1628
- Screw 10g x 5/8 *Used with handles & saddles 1625
- Trigger Snap Clip Stainless 2423
- Oval Hatch cover 6919
- Selleys All Clear 80g 9523
- Female 6.3 Q.C. Connector 9082
- Deck Line Guide - for deck bungee 2342
- HD Saddles & Screws Kit for Running Rigs 1704
- Paddle Park Kit 2093
- Bixpy Electric Jet Motor
-
Kayaking Info
- How To
- Bixpy motor fitting instructions
- Bixpy Connections Maintenance
- Bixpy Uphaul Fitting Instructions
- Rudder Fitting Instructions
- Rudder Cable Tubes Fitting
- Rudder Toe Tabs - Setting up on new Kayak
- Rudder - Profish 440 Instructions
- Rudder - Profish 400 Instructions
- Rudder - Long Blade Fitting Instructions
- Footrests for Espri kayak
- Footrests in Small Kayaks
- Fish Finder - Reload or GT
- Fish Finder - Garmin 400C transducer
- Fish Finder - Fit TotalScan Transducer to Tackle Pod
- How to get back on your kayak guide
- Fish Finder - Profish 400
- Fish Finder - Profish 440
- How to repair a dent in your kayak
- Kayak Storage
- Repair my Kayak
- Propelz Speed paddle - Assembling and adjusting
- Transporting your Kayak
- FG Knot - Tying Braid to Nylon
- Applying new Stickers (Graphics)
- Events Tips & Reviews
- Viking 2+1 Kayak Review : Best Family Tandem Kayak
- Alan Howell Profish Reload Review
- Profish Reload Review
- Kingfish Tips- Jason Kemp
- Matt Watson Reviews the Bixpy Jet Motor
- Kayak fishing light line techniques
- Hunting big snapper out of the kelp this winter
- Taranaki Kayak Fishing Competition 24/25 March 2018
- Kayak fishing & Camping - Get away from it all
- Kingfish off the Profish Reload
- Live Bait Fishing For Kingfish
- Fitting Raymarine Dragonfly Pro to the Tackle Pod
- Catching Longtail Tuna
- which rudder blade concept is better: the short Angler style or the longer
- How to get back on your kayak guide
- Jigging for Kingfish - Kayak Fishing Northland, New Zealand
- Livey pod prototype testing
- IFISH TV get set to take on Viking Kayaks
- Hot Kayak Fishing Tuna Action
- How to Negotiate Surf
- Exploring the concept of kayak fishing using a trailer boat as a mothership
- Kayak fishing light tackle - setting up to go light
- Quick Guide - Garmin Echo 151 DownVu transducer installation into the Reloa
- Kayak Fishing Expedition Season
- Kayak Fishing with Small Frame Reels
- Deep water kayak fishing..
- Cove to Cape "The one that got away! "
- NEW RailBlaza StarPort HD mount : A more stable mounting option for camera
- Viking Kayaks at Outdoor Retailer 2014
- "Double Trouble" Kayak Fishing with Sportsmans Choice / Northland Kayaks
- Top 5 Kayak Fishing accessories that keep the Maniyaks smiling
- Long or short rods for kayak fishing
- Coromandel trip report with "Milkey"
- Fresh Water Kayak Fishing Trip
- Shakedown cruise - too many snapper!
- Landing fish on your kayak, Gaff, Glove, or Net?
- Viking Kayaks owners photos from around the globe 10th-16th June 14
- Saltwater Assassin Northland Snapper Kayak Fishing
- Sunday Kayak fishing session with Saltwater Assassin
- NZBlokesFishTales Taranaki Classic Trip Report
- Hunting big fish out of the kelp and Big fish out deeper this winter
- Kayak fishing trip report Whangarei
- Monster snapper in skinny water kayak fishing
- Winter kayak fishing session at Army Bay
- Tips for smoking snapper wings
- Clothing Tips For Winter Kayak Fishing | Dress For Success
- Live bait tips with Shelley Bradish-Cooney
- Widening your horizons, kayak fishing
- Understanding your fishfinder, Q & A with Stephen Tapp
- How and where to catch popular table fish - tips and facts
- Andrew Fletcher lands his 1st 20lb snapper
- Catching Tuna at the Taranaki KFC
- Storing your kayaks
- Customer feedback : Jolene & Cliff from Mission Bay
- Customer Review - Profish Reload
- Positioning your rod holders for trolling
- Taranaki Kayak Fishing Classic 2014 overview
- Be seen on the water at night with good lighting
- Do you need to troll at speed to catch Tuna?
- Taranaki Tuna hunt
- Matt Watson adds Profish Reload to his fleet
- Kayak Fishing with the NSKFC
- Profish Reload Review - Shelley Bradish-Cooney
- what was I thinking, why did I bring a knife to a gun fight?!
- When kayak fishing I wouldn't be without my...
- Why trolling bibbed lures can be so successful
- Kayak Fishing & Exploring Cuvier Island with Viking Kayaks
- Safety on the water with Railblaza
- Chill Pod versus Insulated Cover Optimizing your catch
- Invitational Comp 2014
- How to avoid crossovers when trolling multiple lures
- Mothershipping, isnt that cheating?
- Fueling the fire - Nutritional guidlines
- Kayak fishing report Whangarei Heads
- Trolling Lures Q & A session with Stephen Tapp
- How to load & unload your kayak on roof racks
- To rudder or not to rudder
- "Good Vibrations" Tuna Lure choices explained
- Kid Pod review & tips for introducing kids to kayaking
- Night fishing from you Viking Kayak
- Did you bring the bait?
- Trolling hard body lures Q&A with Stephen
- Far North kayak fishing report - Shelley
- Tackle Pod and prepare for success
- Profish Reload Q & A session
- Anticipation and flattened barbs
- Trolling for snapper, the art of fooling Big Red
- Evolution into the Profish Reload
- Q. Strayline fishing, anchor or Burley?
- NZ Kayaker Omokoroa/Tauranga Harbour
- Marinated Raw Fish (Fijian style Kokoda)
- Shopping for the yak fisher in your life
- The Art of trolling from a kayak
- Sunday Sesion at Lake Okataina
- Peter Hughs PB Snapper
- Mothership kayak fishing trip, preparation
- Keeping catch cool and fresh -
- Kingfish at 3 Kings Islands part 2
- Kingfish at 3 King Islands Part 1
- Shane Walton 1st 20lb snapper from Kayak
- Coromandel Gold Rush 2013
- Night fishing with Jason Milne
- Viking NZBlokes report Invitational & Coro Gold Rush
- Maniyaks Trip report coro gold & Inv
- Kayak Fishing Clubs
- BAF Talk Kayak fishing
- Invitational 2013
- Capturing the moment | Photography tips
- The Big Berley bash
- Burnsco Marine Guru nights
- Presenting Baits succesfully
- Strip baits & other baits
- Surf Launch & Landing Guide
- Coromandel Gold Rush 2013
- Star vs Lever Drag
- Swimming Pillie Rig
- Viking Invitational
- Announcing the winner of the "Name it to win it" comp
- Tackle pod guest review | PaddleGuy
- What size SLA battery do I need?
- Inspired entries "Name it to win it comp
- Using SLA Batteries on fishing kayaks
- How to catch tuna from a kayak
- Which kayak is best for me?
- Battery types suitable for kayaks
- Kayak Fishing - BOP report by Tim Taylor
- Viking Kayaks TV
- FAQ's
- How To
- Stores
- Contact Us
Rudder Cable Tubes Fitting
1. Use a 5mm bit to drill a neat hole in the middle of the end wall (seat end) of the footrest recesses. It’s important this hole is clean and exactly 5mm for a neat watertight fit with the cable tube.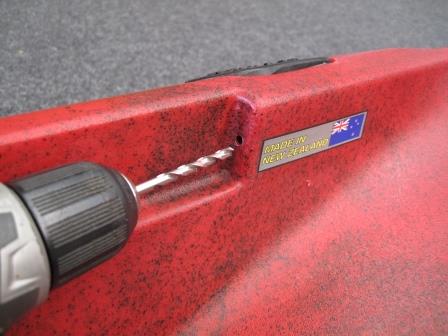
2. Use a sharp 10mm bit to drill a neat hole in the middle of the cable relief areas at the rear of the kayak. Very lightly chamfer the sharp edge on the mouth of the hole – only a tiny amount needs to be removed to make it easier to slide the rubber grommet home later in the installation. 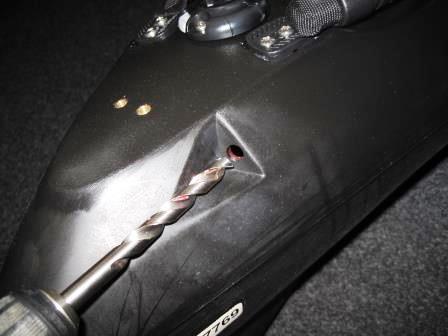
3. Use a nail and thin cord (longer than the cable tube) to draw the cable tube through the kayak using a strong magnet along the outside of the hull is easiest or use fine wire to snag the nail. Notch the end of the tube and tie the drawcord to this notch with a slip knot.
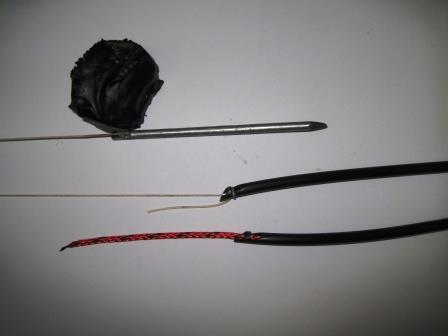
4. Tie a nail or similar to the other end of the draw cord, insert it through the 5mm entry hole.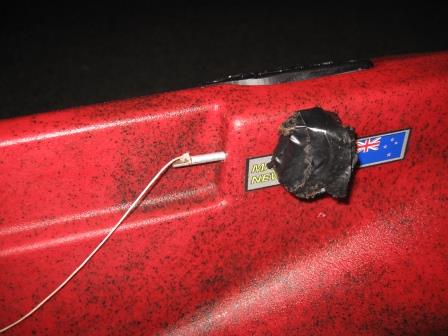
5. Use a strong magnet on the outside of the kayak to slide the nail along the inside of the kayak and out the cable exit at the rear.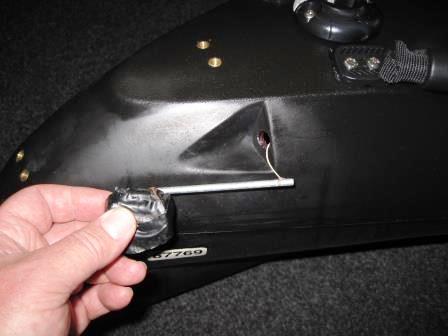
6. Carefully start the cable tube into the 5mm hole, then by feeding the tube into the hole and drawing it along with the draw cord bring it to the rear of the kayak. 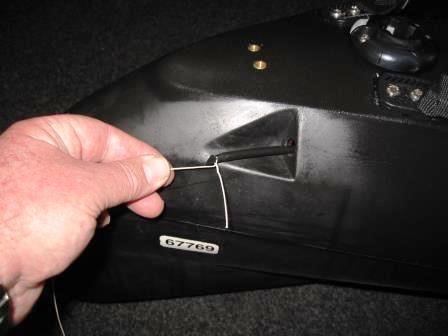
7. The flared end of the cable tube should end up neatly against the entry hole in the footrest recess.
8. At the rear untie the draw string from the end of the cable tube then feed on a rubber mushroom grommet. This will be a tight fit to start but will be easier to slide once the tube is all the way through.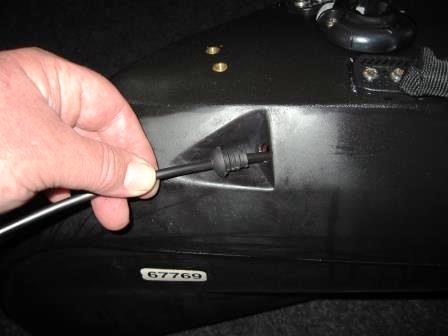
9. Pull all the slack out of the cable tube inside the kayak, then lightly stretch it the length of the rubber mushroom grommet. Holding the cable tube under tension slide the grommet against the mouth of the hole, lightly lubricate it with MS sealant, and finally press into the hole to create a seal. If needed a short piece of 13mm (½ inch) tube can be used to push the grommet in place.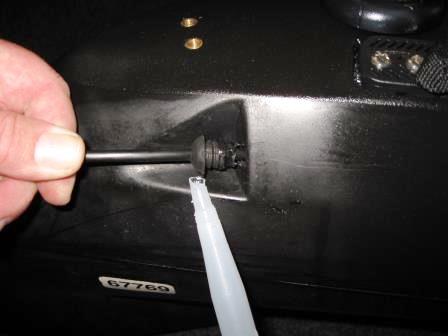
10. With the rubber mushroom grommet in place the final step is to trim the cable tube leaving 50mm (2 inches) of excess. The kayak is now ready for rudder cable installation. 
Your Account
Viking Newsletter
Find Us Also On ...


Your Viking Advantage
Latest Posts
Copyright © 2024. Viking Kayaks. All Rights Reserved.
Website Design & Development: Zenago